Documentation Index

Fetch the complete documentation index at: https://docs.cloudthinker.io/llms.txt

Use this file to discover all available pages before exploring further.

Make every CloudThinker artifact you export feel unmistakably like your company’s report. Configure branding once at the workspace level and every future export — logos in headers, your name in footers, your colors across every chart — picks it up automatically.
Workspace Branding is available on Business and Enterprise plans. Workspace owners and organization admins can edit branding; everyone else with workspace access can view it.

Overview

Workspace Branding lets you customize:
  • Company logo — appears in the PDF header on every page of every artifact export
  • Company name — appears in the PDF footer in place of “CloudThinker”
  • 6-color chart palette — drives every chart, both in the app and in exported PDFs
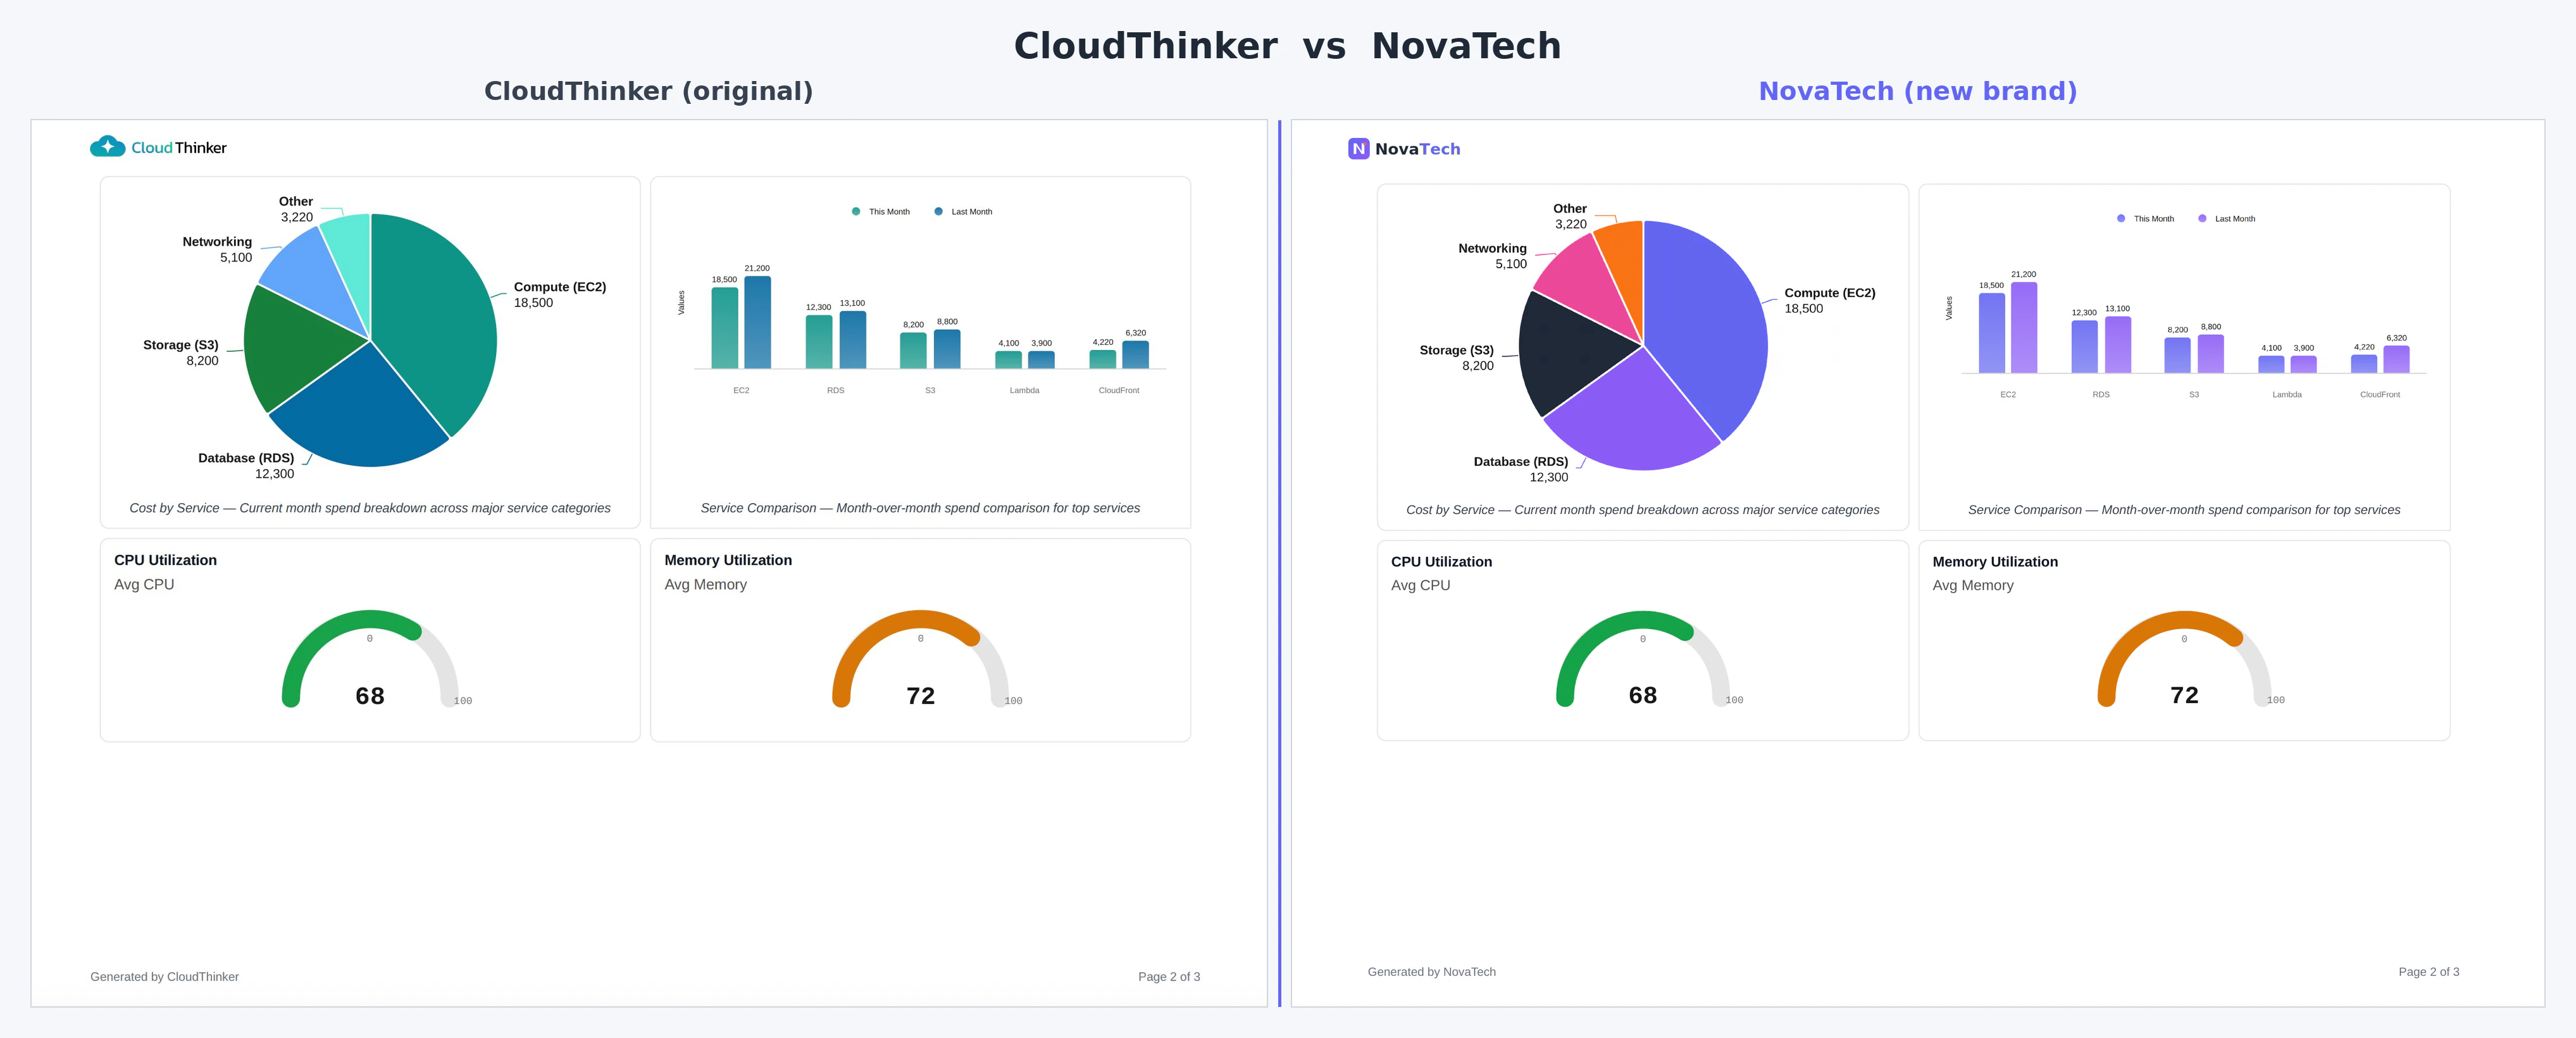
Side-by-side comparison of a default CloudThinker PDF and a fully branded PDF

Before and after: a default CloudThinker PDF (left) versus a fully branded export with custom logo, company name, and palette (right)

Branding is designed around three principles:
  • Set once, apply everywhere. Configure at the workspace level; every future artifact picks it up automatically — no per-export styling.
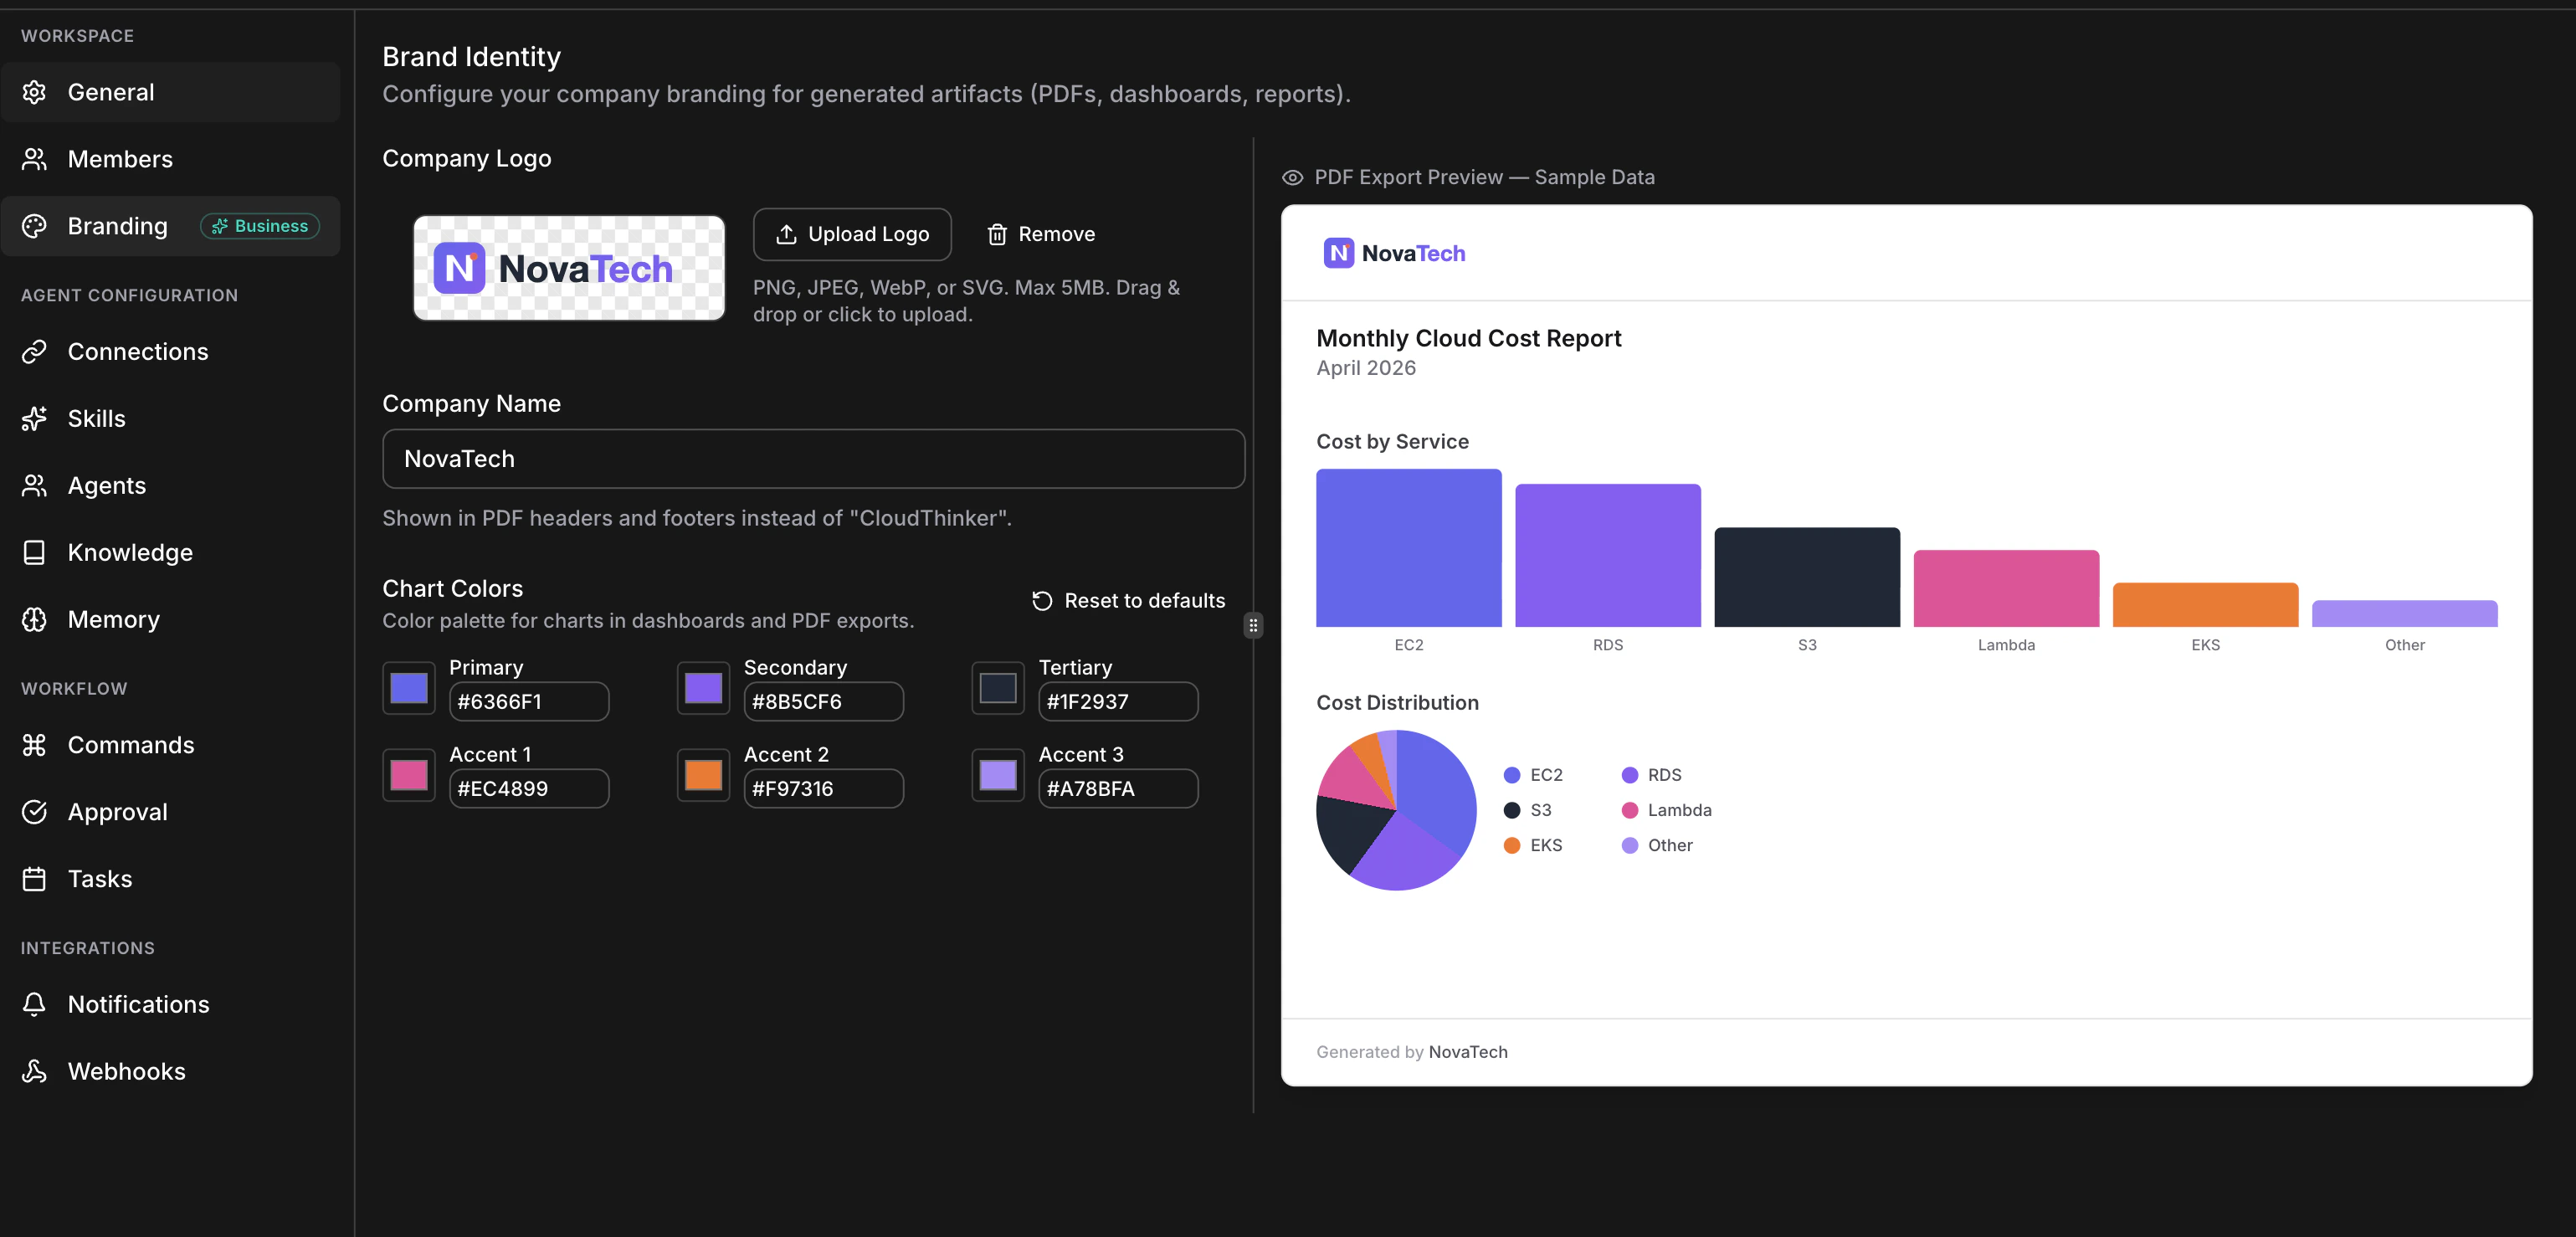
  • Live preview, no guesswork. A right-hand preview panel renders an example PDF as you edit, so you never need a test export to check your work.
  • Additive, never blocking. Workspaces without branding still produce clean PDFs with CloudThinker defaults. Set only some fields (e.g., a logo but no colors) and the rest fall back gracefully.

Quick start (3 minutes)

The fastest path from zero to a branded PDF:
1

Open Workspace Settings → Branding

Click your workspace name in the top bar, choose Workspace Settings, then select the Branding tab (palette icon).
2

Upload your logo

Drag your PNG or SVG into the upload zone (max 5 MB). Wait for the green checkmark.
3

Type your company name

Whatever you type replaces “CloudThinker” in PDF footers.
4

Pick (or paste) your brand color into the Primary slot

The other five slots are fine at default for now — the defaults harmonize with most primary colors.
5

Click Save Brand Settings

Changes commit immediately.
6

Test it

Open any artifact → click Download. Your branded PDF arrives in seconds.
The sections below cover every part of the feature in depth.

Opening Branding settings

Where to find it

The Branding tab lives inside Workspace Settings, one of the per-workspace settings panels.
1

Open the workspace menu

In CloudThinker, click your workspace name in the top navigation bar.
2

Choose Workspace Settings

Select Workspace Settings from the dropdown.
3

Select the Branding tab

In the settings dialog, find the Branding tab in the left sidebar — it’s the one with the palette icon and a small “Business” badge.
4

Edit and preview

The page opens with two panels: editor on the left, live PDF preview on the right.
Full Branding settings page with editor on the left and live PDF preview on the right

Full Branding page layout — editor and live preview side by side

View-only mode

If you have access to view the workspace but not edit branding (i.e., you’re a workspace member, not owner or org admin), the page renders the same but with:
  • A banner at the top: “You have view-only access to brand settings. Contact a workspace admin to make changes.”
  • All inputs disabled and faded (50% opacity).
  • The Save button hidden.
You can still see exactly what your admin has configured and how it will appear in exports.

Responsive behavior

  • Desktop / wide tablets: Editor and preview side by side (roughly 40/60 split).
  • Narrow tablets / phones: The preview hides and the editor takes full width. You can still preview your changes by opening any artifact in a separate browser tab and downloading as PDF.

A few seconds of preparation goes a long way:
  • Use a horizontal layout if you can. The logo renders up to 160 px wide in the PDF header next to the artifact title; tall logos read smaller.
  • Provide transparency if your design has padding around it (PNG with alpha, or SVG). The PDF header has a white background; logos with their own white square will look like a sticker.
  • High enough resolution. For raster formats, aim for at least 400 px wide so the logo stays crisp on retina displays. SVGs scale perfectly at any size.
  • Avoid drop shadows or thin 1px strokes — they often render poorly at small sizes in PDF.
FormatBest forNotes
SVGVector logos with simple shapesScales perfectly; sanitized server-side (scripts removed)
PNGLogos with transparencyUse a 2× or 3× version for retina-sharp results
WebPSame as PNG, smaller file sizeModern format, fully supported
JPEGPhotographic logos (rare)No transparency support

How to upload

You have two ways to upload, both in the Company Logo section at the top of the form. Drag and drop
  • Drag your image file from your file manager onto the dashed upload zone.
  • The zone highlights with the brand primary color when you drag over it.
  • Drop to start the upload.
Click to choose
  • Click the Upload Logo button.
  • Your OS file picker opens.
  • Select a file and click Open.
While uploading you’ll see a spinner and the button label changes to Uploading…. Uploads typically complete in under 2 seconds on a normal connection. When the upload finishes:
  • Your logo appears in a preview area with a checkerboard background (so you can verify transparency is working as expected).
  • The Preview panel on the right updates immediately with your logo in the sample PDF header.
  • A Remove button appears next to Upload Logo if you ever want to delete the logo.
  • To replace: Upload a new file. The old one is automatically removed from storage. There is no separate “replace” button.
  • To remove: Click Remove. Your logo is deleted immediately and PDF exports fall back to the default CloudThinker logo. There is no confirmation dialog, but you can re-upload anytime.

What happens to the file

Behind the scenes, your logo is uploaded directly from your browser to secure cloud storage (Amazon S3) using a one-time presigned URL. CloudThinker servers never see the bytes in transit. The file is stored in a workspace-scoped path so members of other workspaces cannot access it. When an artifact PDF is being generated, the system fetches your logo, embeds it directly into the PDF as a base64 image, and caches that base64 in memory for 10 minutes. In practice this means:
  • The first export after uploading a new logo takes ~1 extra second.
  • Every export within the next 10 minutes is fast (cache hit).
  • Replacing the logo invalidates the cache automatically.

Setting your company name

This is the simplest field. Type your company name into the Company Name input (max 255 characters). It appears in the footer of every PDF page, formatted as:
Generated by <Your Company Name>                          Page 1
If you leave it blank, the footer shows “Generated by CloudThinker”. Special characters (&, <, ", accented letters, etc.) are safe — the system escapes them properly before rendering, so they appear exactly as you typed them.

Choosing your chart color palette

This is the highest-impact branding control. Your six colors drive every chart in your workspace — bar charts in chat responses, dashboards, artifact previews, and every chart embedded in exported PDFs.

The six slots

You configure exactly 6 colors, in this order:
  1. Primary
  2. Secondary
  3. Tertiary
  4. Accent 1
  5. Accent 2
  6. Accent 3
Chart libraries cycle through these in order. A bar chart with 4 series uses Primary, Secondary, Tertiary, Accent 1. A pie chart with 8 slices wraps back to Primary for the 7th and 8th slices. Defaults (what every new workspace starts with):
SlotHexSample
Primary#0d9488teal
Secondary#0369a1sky blue
Tertiary#15803dgreen
Accent 1#60a5falight blue
Accent 2#5eead4light teal
Accent 3#86efaclight green

How to change a color

Each color slot has two controls that stay synchronized:
  • A native color picker (the colored swatch) — click it and a system color picker opens.
  • A hex text input — type or paste a hex code in #RRGGBB format.
Editing either control updates the other in real time. The preview panel on the right redraws immediately so you can judge the result before saving. Three common ways to pick colors:
  1. Paste from your brand guidelines. If your design system already specifies hex codes, type them straight into the inputs. Fastest path.
  2. Eyedrop from your logo. Most OS color pickers have an eyedropper tool; open your logo in a browser and use the eyedropper to grab exact colors from it. Great for cohesion.
  3. Sample from a brand color tool. Tools like Coolors, Adobe Color, or Material Theme Builder generate palettes — paste the 6 colors that best match your brand identity.

Best practices for picking 6 colors

A good 6-color chart palette is harder than it looks.

Start with your primary brand color

Set it as Primary — this becomes the “default” color and the one users associate most with your brand.

Vary hue, not just brightness

If all 6 colors are shades of blue, multi-series charts become unreadable. Mix in greens, oranges, yellows, or purples.

Keep contrast against white

PDFs render on white backgrounds. Very pale colors (e.g., #f5f5f5) disappear on bar or line charts.

Mind color-blind viewers

Avoid placing red and green next to each other — roughly 8% of men have some form of red-green color blindness.

Use the live preview

Edit one color → check the preview bar and pie charts → adjust → repeat. The whole loop takes seconds.

Reset to defaults

Click Reset to defaults to revert all 6 slots to the CloudThinker default palette. The button is only enabled when:
  • Your current edits differ from the defaults, or
  • You have previously saved custom colors.
After clicking Reset you still need to click Save Brand Settings to commit the change.

What about only changing the primary color?

You always edit all 6 slots — there’s no “primary only” mode. If you really want only your primary brand color and don’t care about the rest:
  1. Set Primary to your brand color.
  2. Leave Secondary through Accent 3 at the defaults.
  3. Save.
Every chart with multiple series will still look coherent because the defaults are designed to harmonize.

The live preview panel

The right-hand panel renders an example PDF page using whatever values you currently have in the form. It updates as you type. It shows:
  • Header — your uploaded logo (or the CloudThinker logo if none) plus a sample title like “Monthly Cloud Cost Report — April 2026”.
  • A sample bar chart (“Cost by Service”) with 6 bars in your 6 palette colors.
  • A sample pie chart (“Cost Distribution”) with the same colors and a legend.
  • Footer“Generated by <your company name> (or “Cloud Cost Optimization Platform” if blank).
The preview is intentionally simple — it shows the elements branding affects, not a full reproduction of any real artifact. For a real preview, save and export an actual artifact.

Saving your changes

When you’ve made one or more changes, the Save Brand Settings button becomes active. Click it to commit. Behavior to know:
  • Only fields that actually changed are sent to the server. If you uploaded a logo but didn’t touch colors, only the logo is updated.
  • On success, a green toast appears: “Workspace updated successfully.”
  • On failure, a red toast appears with a clear reason (e.g., “Failed to upload brand logo” or a validation message). Your form values are preserved so you can fix and retry.
  • The Save button shows Saving… while in flight (typically under 1 second).
Logo uploads commit immediately — they don’t wait for the Save button. The moment a logo upload succeeds, it’s live. Save Brand Settings is only for the company name and color fields.

Seeing your branding in an exported PDF

This is the payoff step. Open any artifact in your workspace — for example a cost report or a scorecard — and click Download. The system:
1

Fetch branding

Loads your current logo, company name, and palette.
2

Render artifact body

Renders markdown, tables, and charts with your color palette applied.
3

Wrap in PDF template

Wraps the content with your logo in the header and your company name in the footer.
4

Deliver download link

Returns a presigned download link valid for 1 hour. Your browser downloads the file automatically.

What you should see in the PDF

Header (every page):
  • Top-left: your logo (max 160 px wide, aspect ratio preserved)
  • Right: the artifact title and any subtitle/date
Body:
  • Markdown text, tables, and headings in standard report typography
  • Charts using your 6-color palette — bar, line, area, pie, radar, gauge, and scatter all pick up the new colors
Footer (every page):
  • Left: “Generated by <Your Company Name>
  • Right: page number

Branding in the app vs in PDFs

Branding affects two surfaces with slightly different rules:
ElementIn-app chartsPDF exports
Your 6 chart colors✓ Applied✓ Applied
Your logo✓ Header on every page
Your company name✓ Footer on every page
You’ll see your custom colors immediately in the chat, in dashboard widgets, and in artifact previews. The logo and company name are reserved for PDF exports — that’s where they have the most impact (stakeholders, external sharing, archived reports).

Reference: limits and validation

Quick reference for everything the system enforces.
PropertyValue
Accepted formatsPNG, JPEG, WebP, SVG
Max file size5 MB (5,242,880 bytes)
Rendered width in PDFUp to 160 px (aspect ratio preserved)
SVG handlingSanitized: <script> tags and unsafe attributes stripped before storage
File validationMIME type checked AND magic bytes verified (mislabeled files are rejected)
StorageWorkspace-scoped path; private to your workspace
Cache10 minutes after each read
Auto-cleanupOld logo deleted when you upload a new one

Company name

PropertyValue
TypePlain text
Max length255 characters
Default”CloudThinker”
HTML-escapedYes (safe to type &, <, quotes, accented characters)
Appears inPDF footer only

Chart colors

PropertyValue
Number of slotsExactly 6
Format#RRGGBB hex, case-insensitive (e.g., #0d9488 or #0D9488)
Rejected3-digit shorthand (#fff), missing # (fff000), non-hex characters
Applied toEvery chart type — bar, line, area, step-area, pie, radar, gauge, scatter
CyclingCharts with more than 6 series wrap back to slot 1
DefaultThe 6-color teal/sky/green palette (see the table above)

Plans and roles

PlanView brandingEdit branding
Free, Team— (upgrade required)
Business
Enterprise
Workspace roleViewEdit
Member
Owner
Org admin
Org owner

PDF layout diagram

+---------------------------------------------------+
|                                                   |
|  [Your Logo]      [Artifact Title]                |   ← Header
|                   [Subtitle / date]               |
|                                                   |
+---------------------------------------------------+
|                                                   |
|                                                   |
|             Body content here                     |
|   (markdown text, tables, charts using your       |
|    6-color brand palette)                         |
|                                                   |
|                                                   |
+---------------------------------------------------+
|                                                   |
|  Generated by <Your Company Name>         Page 1  |   ← Footer
|                                                   |
+---------------------------------------------------+

FAQ and troubleshooting

Q: My logo uploaded but the next PDF still shows the old logo.The logo is cached for up to 10 minutes per workspace. If you uploaded a brand-new logo, exports use the new one immediately. If you replaced an existing logo, the cache is keyed to the storage path so the new logo should still appear right away. If after a few minutes the old one persists, refresh the workspace page and export again. If the problem continues, contact support with your workspace ID.Q: I tried to upload a 10 MB PNG and got rejected.The limit is 5 MB. Use a compression tool (TinyPNG, Squoosh) or export from your design tool at a smaller size. A logo never needs to be more than ~800 px wide — PDFs render it at 160 px max.Q: I tried to upload a .gif (or .bmp, .tiff, etc.) and got rejected.Only PNG, JPEG, WebP, and SVG are accepted. Convert to one of those formats first.Q: I uploaded a file with the right extension but it was still rejected as “invalid content type”.The system checks both the file extension AND the actual file contents. If you renamed a .bmp to .png, the magic bytes don’t match PNG and the upload is rejected. Re-export from a real image editor as a true PNG.Q: My SVG looks different in the PDF than in my design tool.SVGs are sanitized server-side — embedded scripts, animations, JavaScript event handlers, and certain dangerous tags are stripped before storage. If your logo depends on any of those (most don’t), export it as a static PNG instead. Simple shape-based SVGs always work as expected.Q: My PNG logo looks blurry in the PDF.The PDF renders the logo at up to 160 px wide. If your source PNG is smaller than that, it will be upscaled and appear blurry. Re-export at a higher resolution (we recommend 400 px wide minimum for retina sharpness).Q: My logo has a white square around it.Your source file has no transparency — it’s a solid rectangle. Export from your design tool with the canvas set to transparent, or use SVG which doesn’t have a background by default.
Q: I typed #fff and it shows as invalid.The system requires the full 6-digit hex format (#RRGGBB). Use #ffffff instead of #fff.Q: I want only my primary brand color, do I have to fill all 6 slots?You always edit all 6 slots, but you can leave 5 of them at the defaults — the defaults are designed to harmonize with most primary colors. Or pick a small set (e.g., 3 brand colors) and repeat them across the 6 slots.Q: Can I use more than 6 colors?No. The palette is fixed at 6 slots. Charts with more than 6 series cycle back through the palette.Q: I changed my colors but old PDFs I already downloaded still show the old colors.Expected. Each PDF is generated at export time using the branding active at that moment. To get a PDF with current branding, re-download the artifact.
Q: I see a “Brand customization requires a Business or Enterprise plan” message.Branding is a paid feature. Talk to your organization’s billing owner about upgrading.Q: I have a Business plan but the form is greyed out with a view-only banner.You have permission to view the workspace but not edit branding. Workspace owners, org admins, and org owners can edit. Ask one of them to make the changes or to grant you owner role on this workspace.Q: Can different workspaces in my org have different branding?Yes. Branding is scoped to each workspace, not the organization. A company with multiple workspaces (one per customer, per environment, per business unit) can brand each independently.
Q: Is my uploaded logo private?Yes. Logos are stored under a workspace-scoped path and served via short-lived presigned URLs. Members of other workspaces cannot access your logo. Artifacts you share publicly via share links do include your logo and brand colors — that’s the whole point of branded sharing.Q: Can I export an artifact without my branding (for a draft or internal review)?Not currently — every export uses the active branding. As a workaround, you can temporarily remove the logo and clear the company name, export, then restore your branding. A “draft export” mode is under consideration for a future release.
Q: How do I completely reset everything to defaults?
  1. Click Remove next to your logo.
  2. Clear the Company Name input.
  3. Click Reset to defaults under Chart Colors.
  4. Click Save Brand Settings.
Future exports will use the CloudThinker default logo, footer text, and color palette.Q: I changed branding — do I need to regenerate old artifacts?No. Existing artifacts in your library don’t have any cached PDF — every download generates a fresh PDF with current branding. Old downloads already on someone’s laptop will keep their old branding (they were generated then), but anyone re-downloading from CloudThinker gets the latest.

Tips and best practices

Treat your palette like a design system

Pick colors that work together; document them in your team wiki; revisit if your brand evolves. CloudThinker becomes part of your brand surface area.

Test with one real artifact first

The live preview is accurate, but rendering a real cost report end-to-end is the best confidence check. Generate one branded PDF, share internally, gather feedback, then announce branding to your team.

Keep your logo file safe

Whoever owns CloudThinker branding (often the FinOps lead) should keep the source SVG or PNG accessible so it can be re-uploaded if needed. Don’t lose the source file.

Coordinate with your design team

Ask them for the official hex codes, the approved logo lockup for square or horizontal layouts, and whether dark-mode variants exist. CloudThinker PDFs render on white only, so use the version designed for light backgrounds.
Set branding before inviting external viewers. If you’re planning to share an artifact externally, set branding first. A first impression with the default CloudThinker palette is hard to undo.

Next Steps

Manage Workspaces

Create and manage workspaces within your organization

Manage Organization

Configure organization settings, billing, and enterprise features